Translate E2CA Comments
The Translate E2CA Comments feature in E2CA leverages AI technology to automatically translate case comments across different languages, enhancing communication between support agents and global customers. This functionality allows agents to view and respond to customer inquiries in their preferred language while enabling customers to receive support in their native language.
![]()
How to Access
Admin Configuration
-
Log in to Salesforce Lightning Experience with System Administrator privileges.
-
Navigate to the E2CA Console App.
-
Click on AI Configuration in the left navigation menu.
-
Select Translate E2CA Comments from the submenu options.
-
This will open the Translate E2CA Comments configuration page.
Configuration Options
This feature enables the translation of E2CA comments into multiple languages, using following AI models:
-
Prompt Template
-
Uses predefined AI prompts to translate comments
-
Ideal for organizations with existing Salesforce Einstein or similar AI capabilities
-
-
Models API
-
Uses Salesforce supported AI models to translate comments
-
-
External/3rd Party API
-
Integrates with external translation services like OpenAI or Google's Gemini
-
Useful for organizations with existing subscriptions to these services
-
![]()
Setup Process
-
Enable the Feature
-
Toggle the switch in the top right corner to enable the Translate E2CA Comment functionality.
-
-
Select AI Model
-
From the dropdown menu, choose the AI model
-
Options include: Prompt Template, Models API, and External/3rd Party API.
-
-
Configuration Based on Selected Method:
A. If Using Prompt Template:
-
Select a predefined Prompt Template from the dropdown list.
-
Available template:
-
E2CA Translate Comments
Note: You can use (E2CA Translate Comments) as the default template.
-
-
Creating Custom Prompt Templates:
If you want to create your own custom prompt template:
-
Navigate to Setup > Prompt Builder.
-
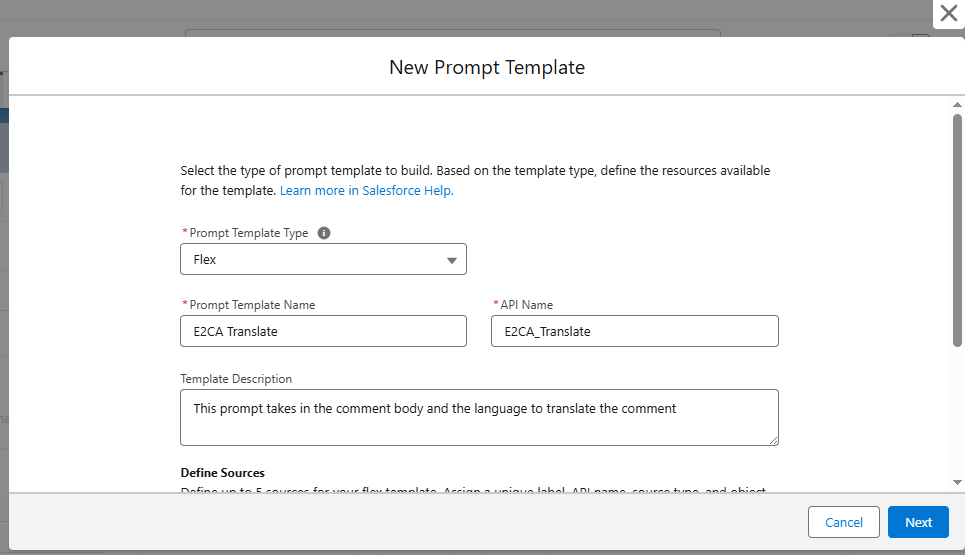
Click "New Prompt Template" to open the template creation dialog. Show Image
-
Configure the prompt template:
-
Prompt Template Type: Select "Flex"
-
Prompt Template Name: Enter "E2CA Translate" or your preferred name
-
API Name: The system will generate this based on your template name
-
Template Description: Enter "This prompt takes in the comment body and the language to translate the comment."
-
-
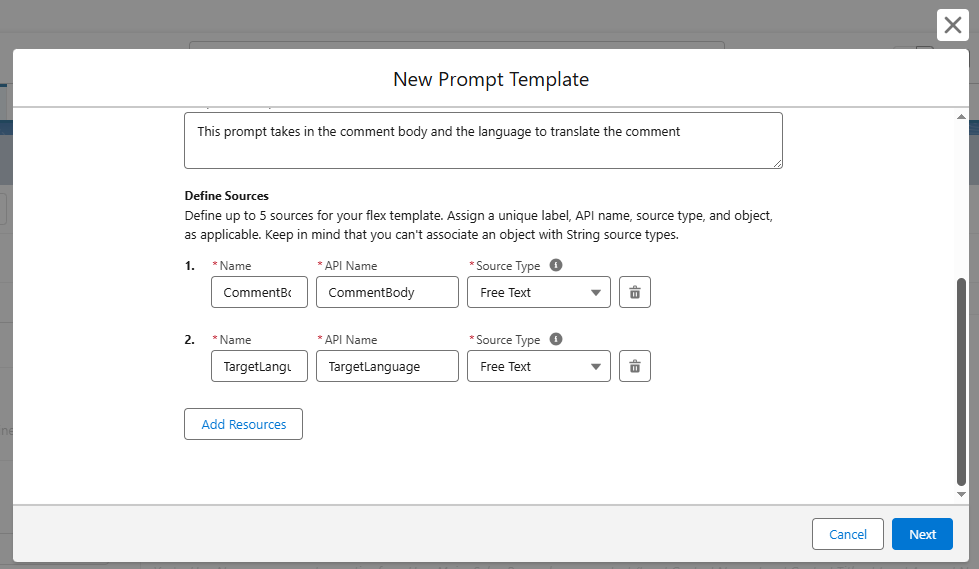
Define the necessary sources:
-
Source 1:
-
Name: CommentBody
-
API Name: CommentBody
-
Source Type: Free Text
-
-
Source 2:
-
Name: TargetLanguage
-
API Name: TargetLanguage
-
Source Type: Free Text
-
-
-
Create the prompt content:
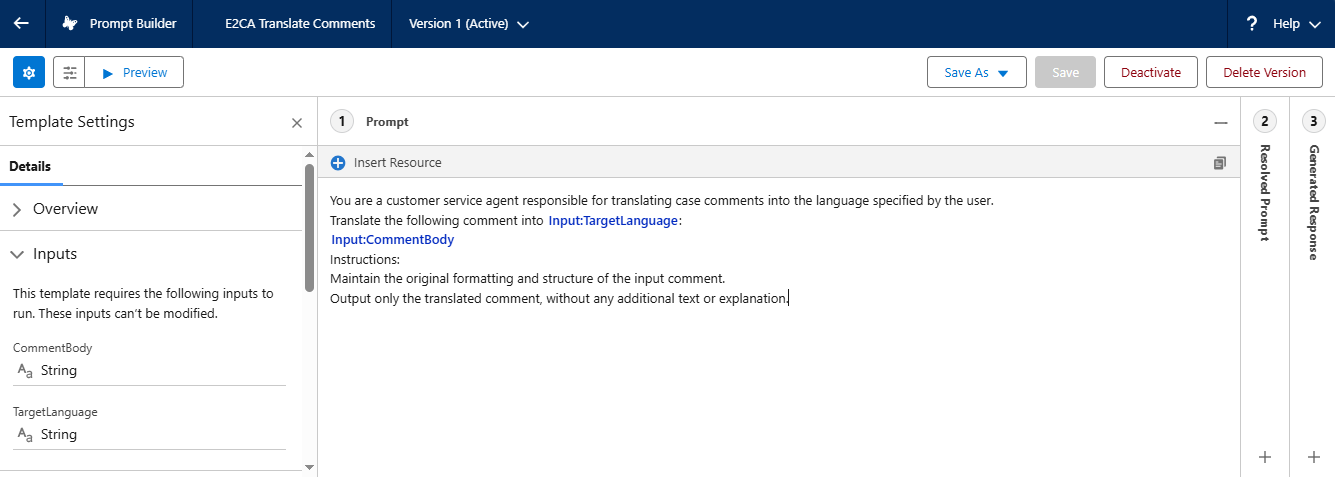
Important: If you have your own prompts, you must enter the following exact instructions in the prompt field:
“You are a customer service agent responsible for translating case comments into the language specified by the user.
Translate the following comment into {!$Input:TargetLanguage}:
{!$Input:CommentBody}
Instructions:
Maintain the original formatting and structure of the input comment.
Output only the translated comment, without any additional text or explanation”.
-
Click "Save & Preview" and then "Activate" to make the template available for use.
B. If Using Models API:
-
Enter the Model API Name in the provided field.
-
Example: sfdc_ai__DefaultOpenAIGPT4OmniMini
-
For a complete list of supported models, refer to the Salesforce documentation on supported models.
Note: The Model API Name must match exactly with one of Salesforce's supported models.
C. If Using External/3rd Party API:
-
Select a 3rd Party API Model from the dropdown list.
-
Available options include:
-
OpenAI
-
Gemini
-
-
After selecting a 3rd party provider, you'll need to provide the following information:
-
External/3rd Party Model API Name:
-
For OpenAI, enter the model name (e.g., gpt-4, gpt-4.1)
-
For Gemini, enter the model name (e.g., gemini-2.5-flash)
-
Refer to OpenAI Models documentation or Google AI Gemini API documentation for specific model names
-
-
External/3rd Party API Endpoint:
-
Enter the API endpoint URL for the selected service
-
For OpenAI, example: https://api.openai.com/v1/chat/completions
-
For Gemini, example: https://generativelanguage.googleapis.com/v1/models/{model}:generateContent
Note: Ensure the remote site URL(i.e. API endpoint URL) is available under remote site settings (eg:OpenAI-https://api.openai.com)
-
-
External/3rd Party API Key:
-
Enter your API key for the selected service
-
This is the authentication key provided by OpenAI or Gemini
-
-
-
-
Click "Save" to apply your settings.
How to Use
Accessing Translation in Comment Timeline
-
Navigate to the Case:
-
Open a case record in the E2CA Console App.
-
View the Comment Timeline where all case communications are displayed.
-
-
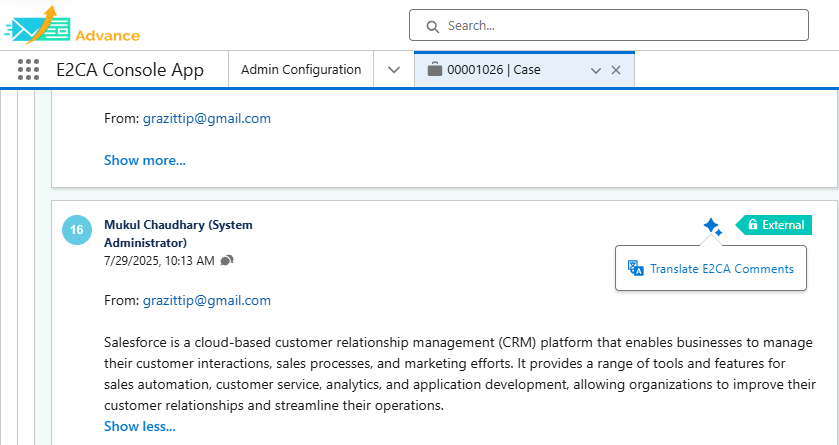
Locate the Translation Button:
-
Each comment in the timeline includes a AI configuration icon
-
-
When you click on the icon, you'll see “Translate E2CA Comments” feature
Translating Comments
-
Initiate Translation:
-
Click on the Translate E2CA Comments link
-
A translation dialog box will appear.
-
-
Select Target Language:
-
From the dropdown menu at the top of the dialog, select the language you want to translate the comment into.
-
The system supports numerous languages including:
-
English
-
Spanish
-
French
-
German
-
Chinese
-
Japanese
-
And many more regional and international languages
-
-
-
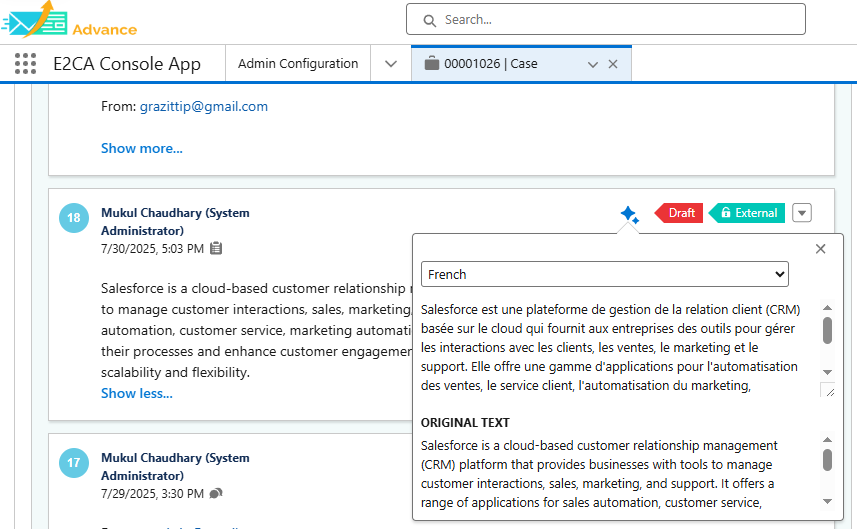
Review Translation:
-
The dialog box displays both the original text and the translated text:
-
The upper section shows the translated comment.
-
The "ORIGINAL TEXT" section below shows the original content for comparison.
-
-
Review the translation for accuracy and context.
-
-
Finalize Translation:
-
After reviewing, you can:
-
Close the dialog by clicking the "X" in the top-right corner to return to the Comment Timeline.
-
Select a different language from the dropdown to see the comment translated into another language.
-
-
Tips
-
API Model Reference:
-
When using Models API, ensure you're using the correct model name from the Salesforce supported models documentation.
-
When using OpenAI, refer to their models documentation for the latest model versions and capabilities.
-
When using Gemini, check the Google AI Gemini API documentation for current model options.
-
-
API Keys and Security:
-
Keep API keys secure and never share them publicly
-
-
API Costs:
-
Be aware that external API services like OpenAI and Gemini typically charge based on usage
-
Monitor API usage to manage costs effectively
-
Consider implementing rate limiting for high-volume environments
-
Enable Image Text Extraction
The Image Text Extractor feature in E2CA leverages Optical Character Recognition (OCR) to extract text from images attached to comments. Designed for Salesforce Lightning Experience, this feature enables agents to preview images, select specific areas for text extraction, and utilize the extracted text for case management or customer responses. It automates the process of handling image-based inputs (e.g., screenshots), reducing manual effort and improving accuracy. Integrated with E2CA's existing workflows, it supports global support teams by processing images from emails and case updates efficiently.
How to Access
Admin Configuration
![]()
-
Log in to Salesforce Lightning Experience with System Administrator privileges.
-
Navigate to the E2CA Console App.
-
Select Manage General Configuration > Manage Case Comments to access the Image Text Extraction settings.
-
Enable the Enable Image Text Extractor toggle.
-
Enter a valid Domain Base URL (e.g., https://your-org-domain.lightning.force.com).
Note: An error message (e.g., "Invalid Domain Base URL. Please enter a valid Salesforce Lightning Experience URL.") appears if the URL is incorrect; correct and save to proceed.
-
-
Click Save to apply settings.
Agent Access
![]()
-
Agents access the feature directly on the Comment Timeline of a Case record after the admin enables it.
-
No additional setup is required for agents; the Extract Text button appears automatically for image attachments.
-
Images attached to case comments are displayed in the Comment Timeline with a clickable link.
How to Use
Previewing and Extracting Text
-
Access Image in Comment Timeline:
![]()
-
Open a Case record and navigate to the Comment Timeline.
-
Locate a comment with an image attachment (indicated by a file link).
-
Hover over the image link to view the attached image.
-
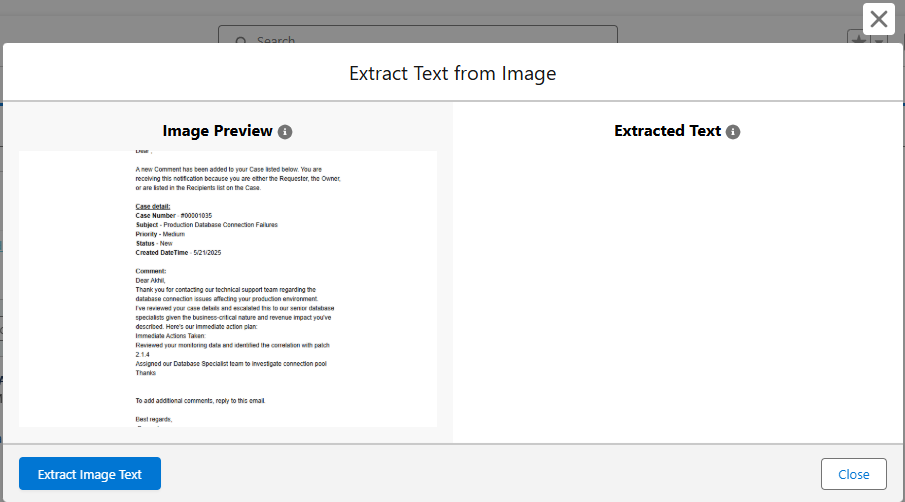
Extract Text from Image:
-
When viewing the image preview, click the Extract Text button located at the bottom of the preview.
-
The system will display the Extract Text from Image dialog with two panels
-
-
Select Text Extraction Method:
A. Full Image Extraction:
-
By default, the system will process the entire image.
-
Click the Extract Image Text button to extract text from the full image.
B. Selective Text Extraction:
-
For more precise extraction, use the cropping feature:
i. Discover Available Options Through Tooltips:
![]()
-
Hover over the Image Preview information icon (i) to reveal the tooltip: "Hover over the image to crop and focus on the desired area before extracting text."
-
This tooltip provides guidance on how to use the selective extraction feature.
ii. Use the Cropping Tool:
![]()
![]()
-
Hover over the image to reveal the Crop Image icon (pencil icon).
-
Click this icon to activate the cropping tool.
-
Draw a selection box around the specific text area you want to extract.
-
The system will only process text from the selected area.
-
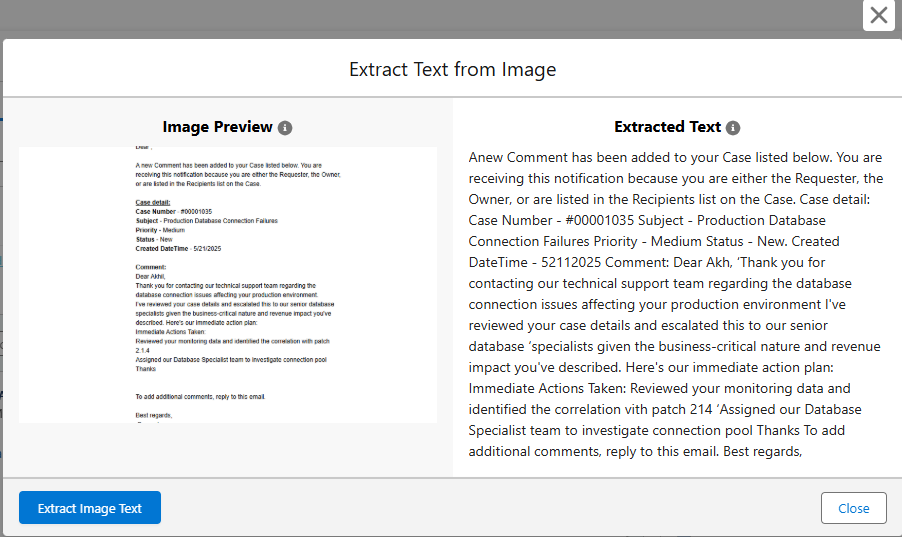
Review Extraction Results:
-
The left panel shows the original image or your selected area.
-
The right panel displays the extracted text after OCR processing.
Considerations:
-
Hover over the Extracted Text information icon (i) to see important factors affecting extraction quality:

-
This tooltip helps users understand potential variations in extraction results.
-
Use Extracted Text:
-
Review the extracted text for accuracy.
-
Click Close to return to the case.
-
-
Handling Partial Text Extraction:
-
If the OCR process doesn't capture all text or if you need only specific portions of the text, you can manually select and copy just the relevant sections from the extracted text panel
-
Tips
-
Image Quality: For best results, ensure that images are clear, well-lit, and have good contrast between text and background.
-
Image Format: The feature supports common image formats including JPG, JPEG, PNG, and GIF. For best OCR performance, use PNG or high-quality JPG files.
-
Text Formatting: OCR works best with standard fonts and may struggle with highly stylized text, handwriting, or text embedded in complex backgrounds.
-
Pay Attention to Tooltips: Hover over information icons (i) throughout the interface to reveal helpful guidance and tips.