Comment Timeline Setup
Post successful installation of the product E2CA from the AppExchange and enabling the features setting from the Admin panel, the admin is required to make the below setting in their org, allowing the agent to visualize comment timeline.
Salesforce Permissions
The package comes with inbuilt Salesforce permissions required for E2CA. Under Setup ->Home ->Profiles ->Salesforce Administrator has all the permissions as shown below:
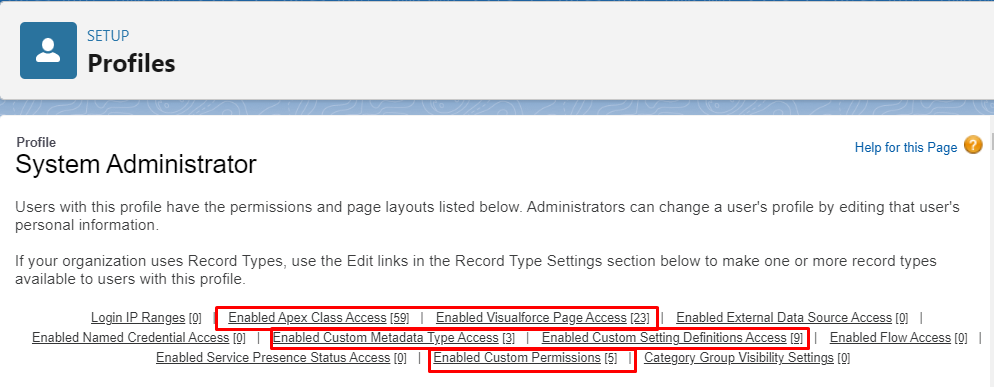
The System Administrator profile includes all the permissions required for the functioning of E2CA:
-
Enabled Apex Classes
-
Enabled VisualForce Pages
-
Enabled Custom Metadata Type
-
Enabled Custom Permissions
-
Enabled Custom Setting Definitions
-
Object and Field Level Security
-
Custom and Standard App Settings
-
Tab Settings
-
Record Type Settings
-
Administrative Permissions
-
Record Level Security
-
General User Permissions
-
Standard and Custom Object Permissions
-
Article Type Permissions
-
Platform Event Permissions
-
Session Settings
-
Password Policies
The Admin has the ability to clone the profile and customize the settings and permissions as per the requirements or create a new profile and set the permissions accordingly using the predefined permissions available from the package.
Comment’s Edit/Delete Permissions
New permission controls have been implemented. Only users with "can_edit_delete_comments" or "can_edit_delete_comments_admin" permissions can edit or delete comments.
-
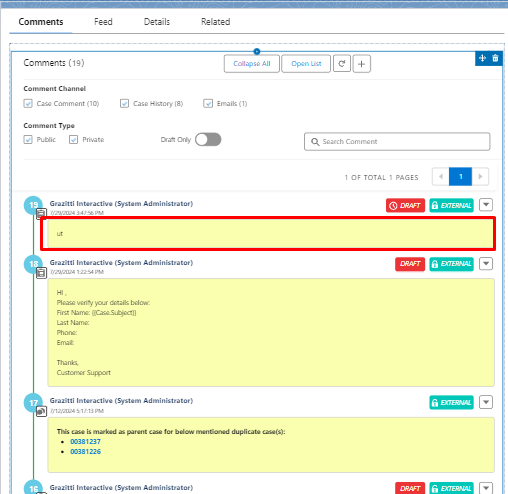
If only the "can_edit_delete_comments" custom permission is given to a profile, then the logged-in user belonging to this profile can edit/delete only those comments he has created.
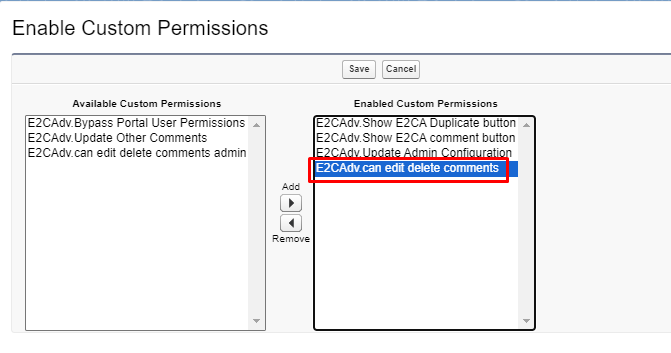
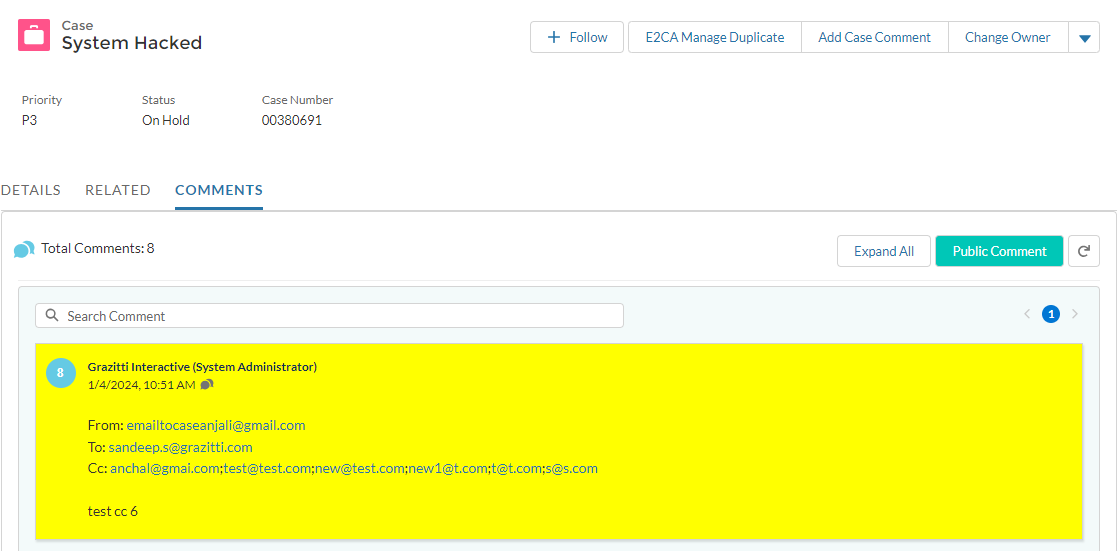
The below highlighted comment is created by another user, so the logged-in user (EmailToCase Advance) is not able to edit/delete this comment as the options are disabled for the logged-in user.

-
If only "can_edit_delete_comments_admin" custom permission is given to a profile, then the user can edit/delete all the comments irrespective of their owners as shown in the screenshot below:
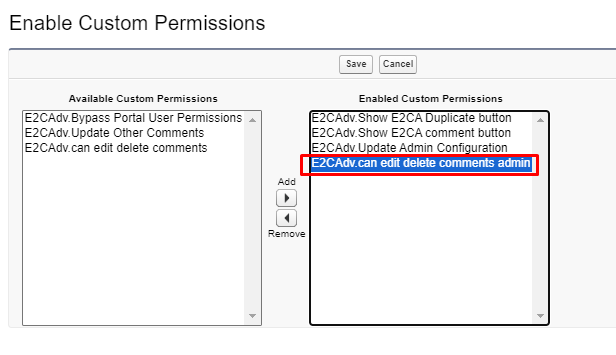
The highlighted comment below was created by another user, but the logged-in user (EmailToCase Advance) can edit/delete this comment because of the can_edit_delete_comments_admin custom permission.

-
If neither "can_edit_delete_comments" nor "can_edit_delete_comments_admin" custom permission is given to a profile, then the logged-in user belonging to this profile cannot edit/delete any comment, as shown in screenshot below.

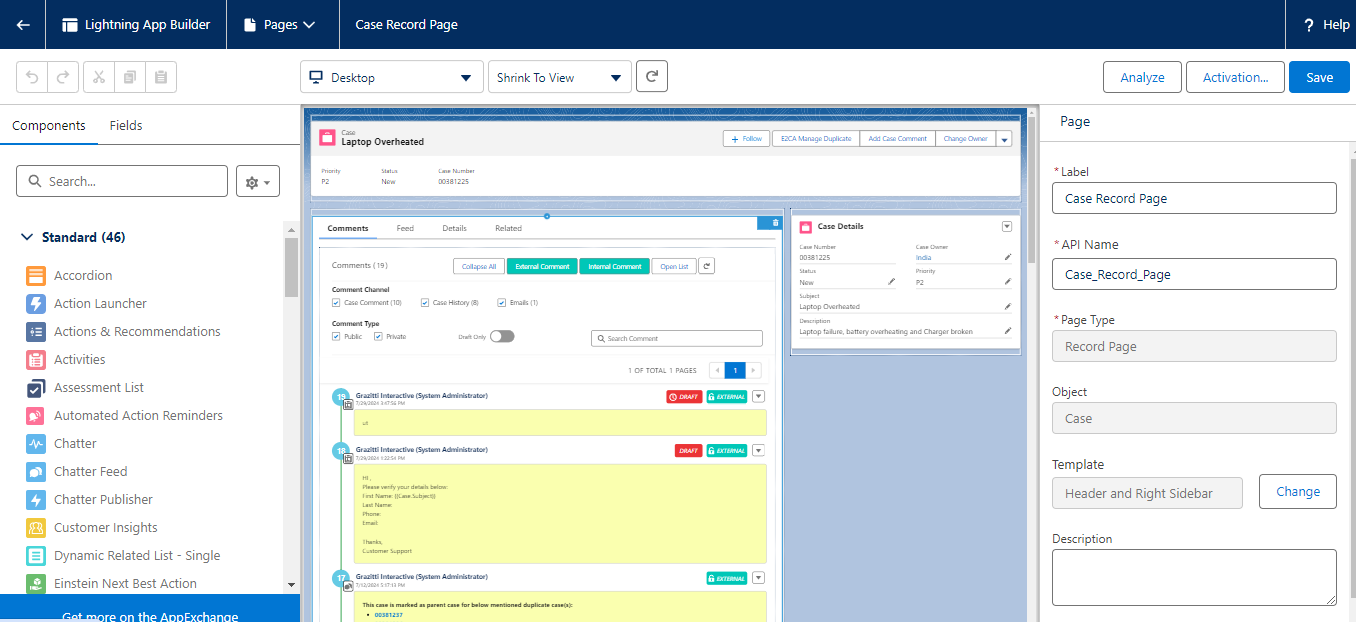
Customize Comment Timeline
Post verifying the permissions and settings, the admin is required to customize the comment timeline as per the below process.
-
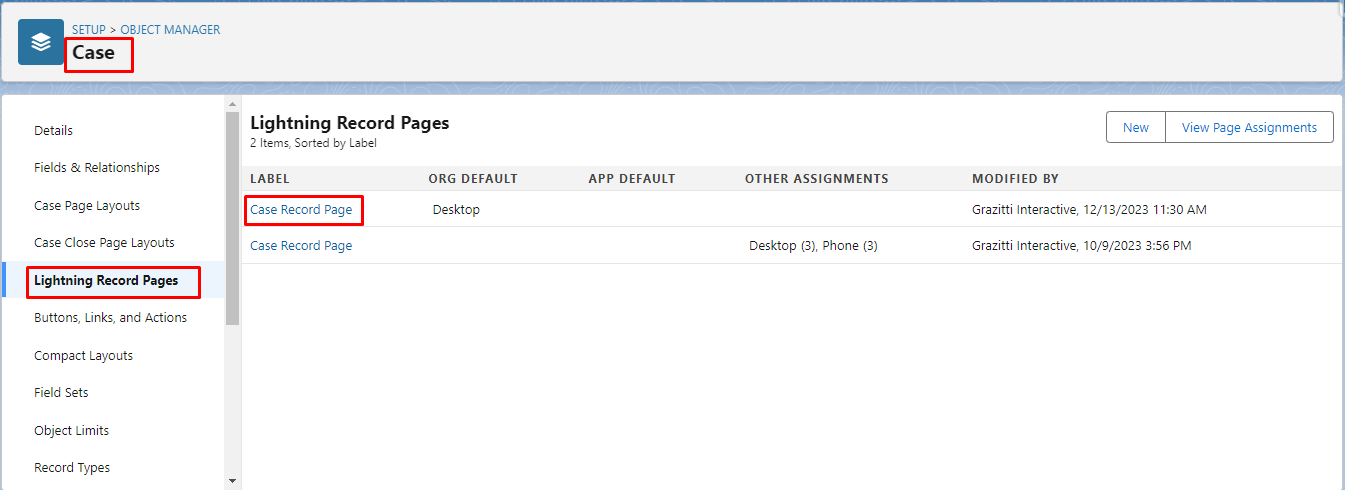
Click on Setup - Object Manager - Case - Lightning Record Pages - Case Record Page.
-
Click on Edit.

-
The admin will be redirected to the builder page.
-
Select the Feed and Related section by clicking on the same component and clicking on Add Tab button.
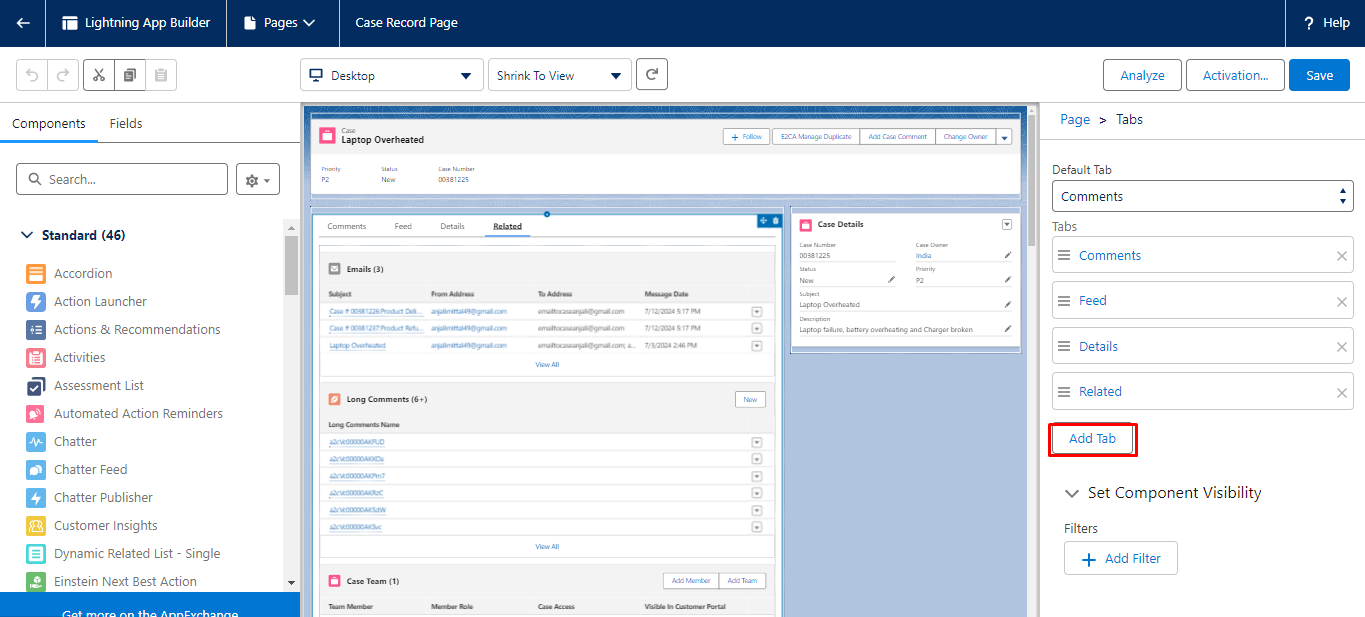
-
The Details tab gets added by default. Click on the default tab, a popup window will appear in which select Custom in the Tab Label and type Comments in the Custom Label and click on Done.

-
The Comments tab gets added on the Component.
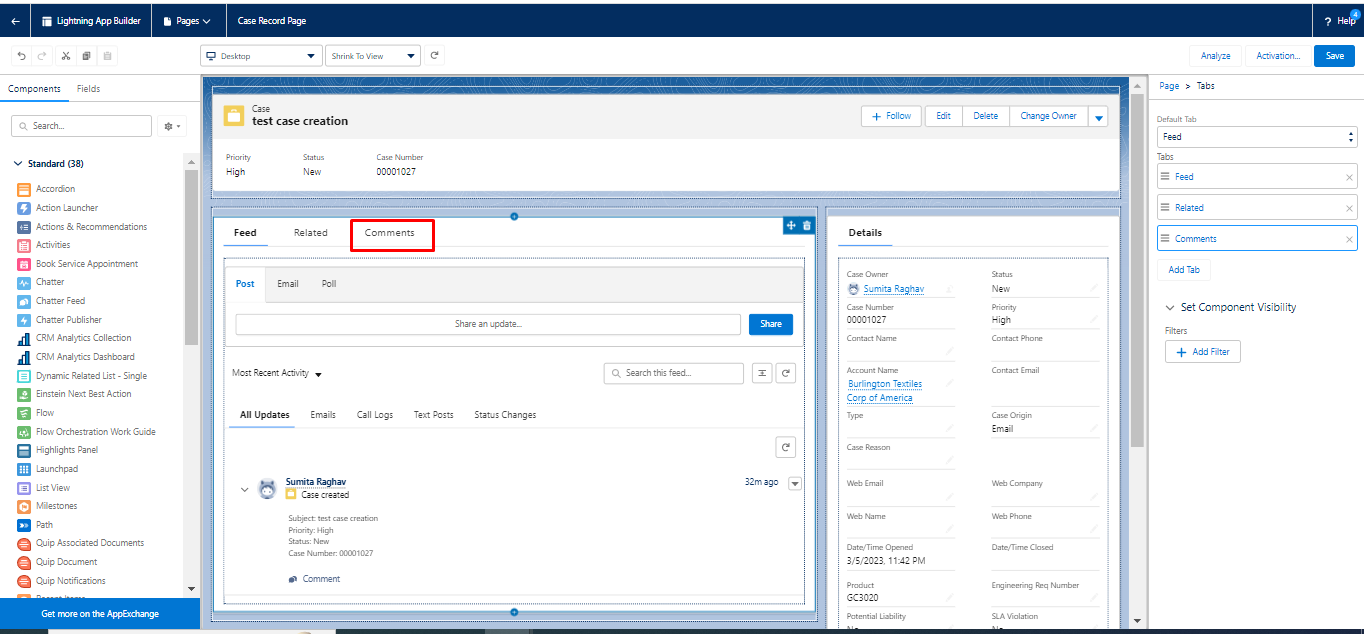
-
Click on the Comment section, search the comment timeline under the component and drag the Comment Timeline from the Custom-Managed component under the comment section.
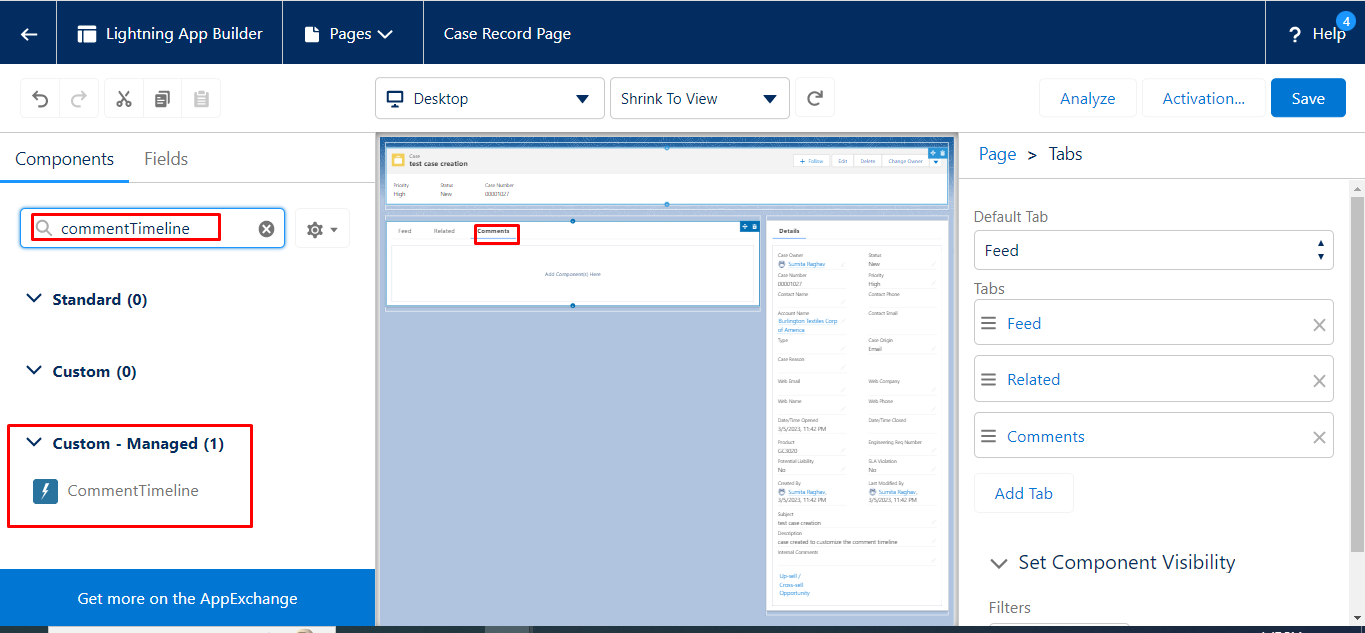
-
The admin has the ability to customize the comment timeline using the mentioned steps.
-
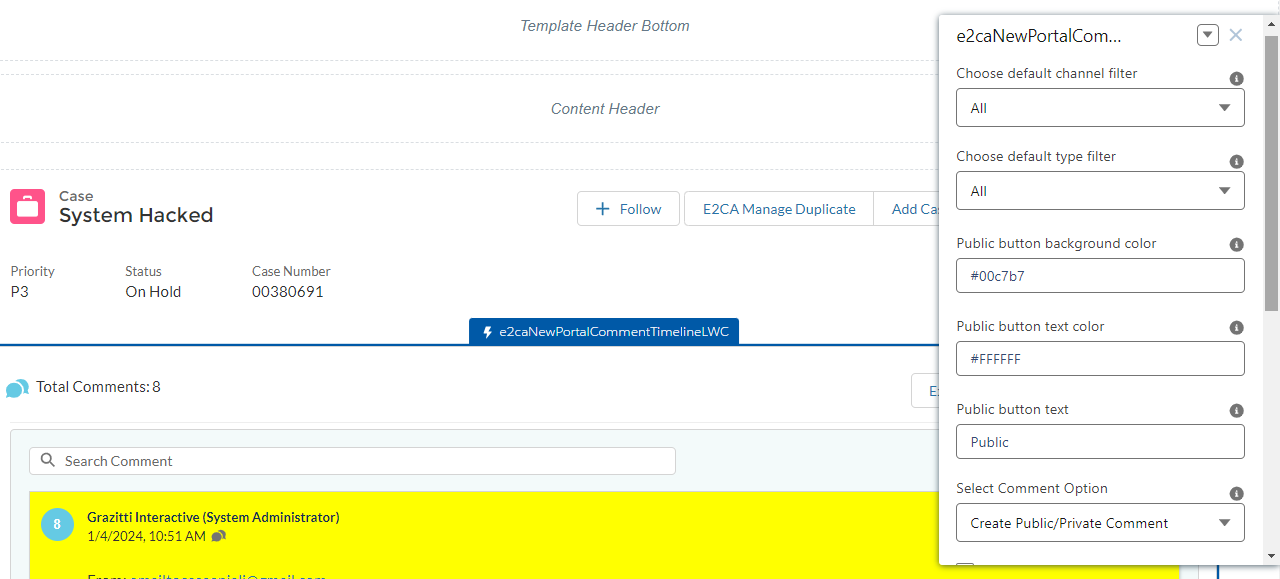
Click on the Comment Timeline Component, the side menu pop ups as shown below. Use the different design attributes to customize the Comment Timeline as per the requirements.
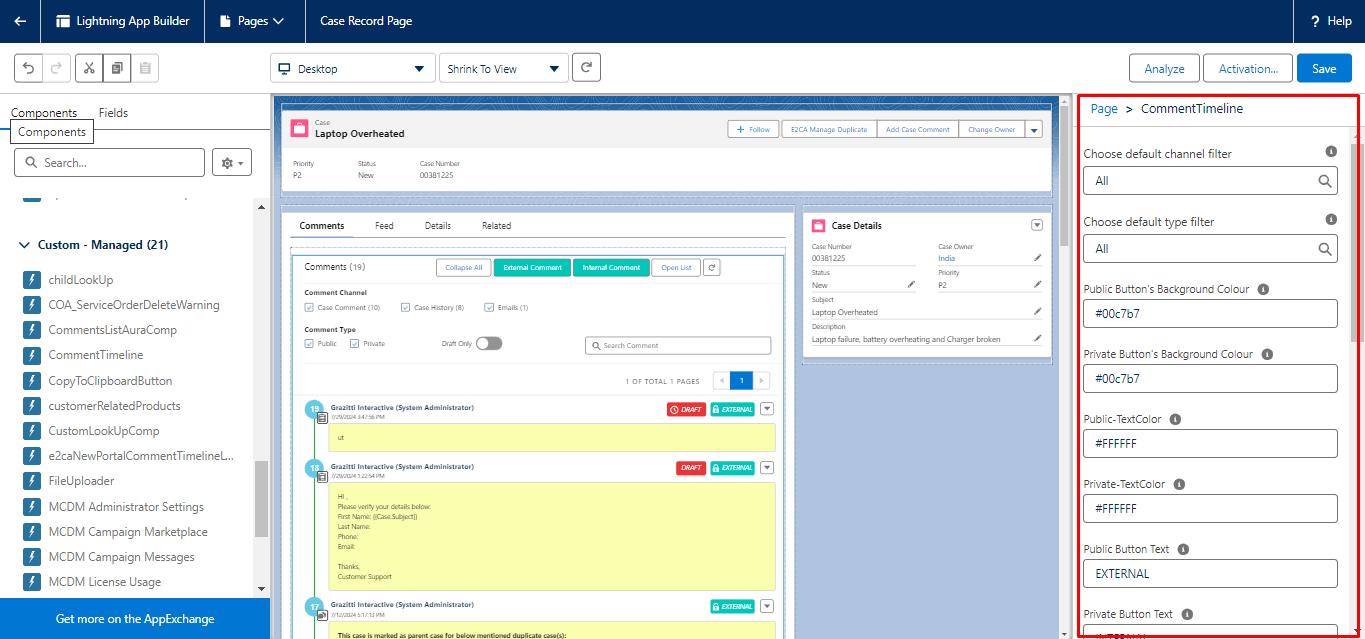
Certainly! Here is the detailed information about the new design attributes for comment customization:
-
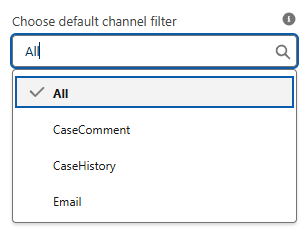
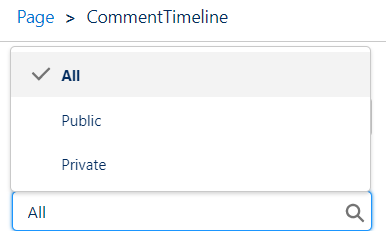
The admin can make the following changes:
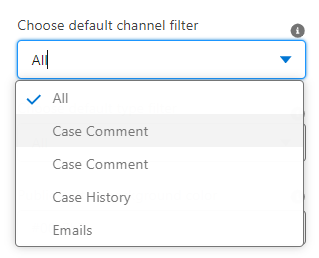
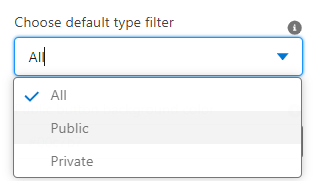
 Choose the default channel and default type filter,
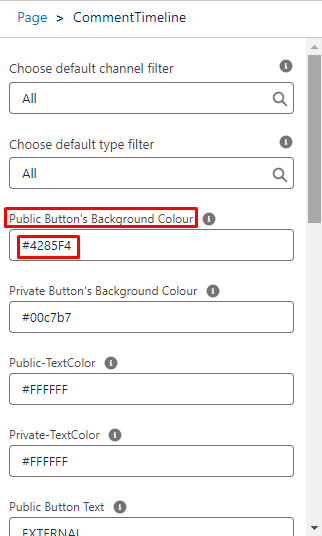
b) Public and Private Button Background Color:
This feature allows customization of the background color for public and private comment buttons.
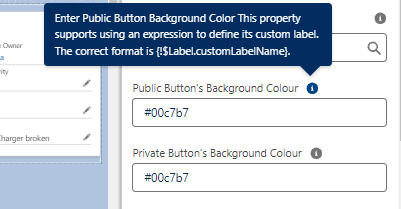
How to configure: Navigate to the Comment Timeline Component settings
-
Navigate to the Comment Timeline Component settings.

-
For public comments:
-
Enter the desired color code in the "Public button background color" field (e.g., #4285F4 for blue).
-
-
For private comments:
-
Enter the desired color code in the "Private button background color" field (e.g., #00c7b7 for green).
-
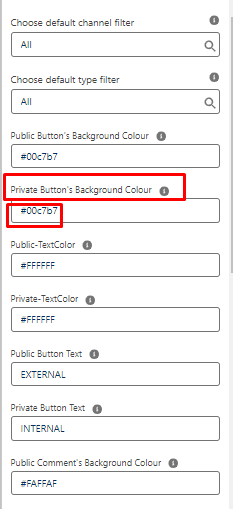
Functioning: After configuration, the background color of the public comment button has changed to the specified color ( blue for #4285F4). The same applies to the private comment button with its respective color code.
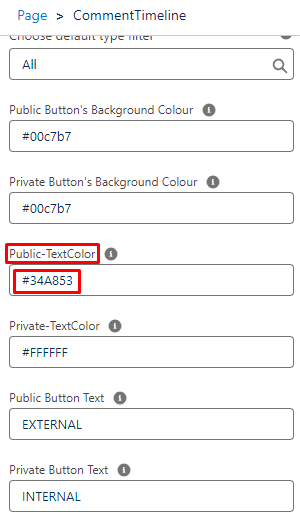
c) Public and Private Text Color
This feature allows customization of the text color for external (public) and internal (private) comments.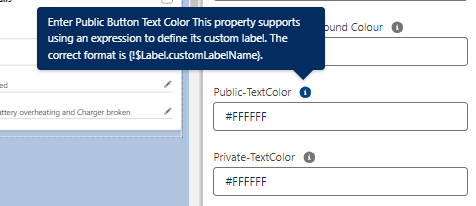
How to configure:
-
Navigate to the Comment Timeline Component settings.
-
For public comments:
-
Enter the desired color code in the "Public text color" field (e.g., #34A853 for green).
-
-
For private comments:
-
Enter the desired color code in the "Private text color" field (e.g., #FFFFF for white).
-

Functioning: After configuration, the text color of external comments has changed to the specified color (green for #34A853). The same applies to private comments with their respective color code.
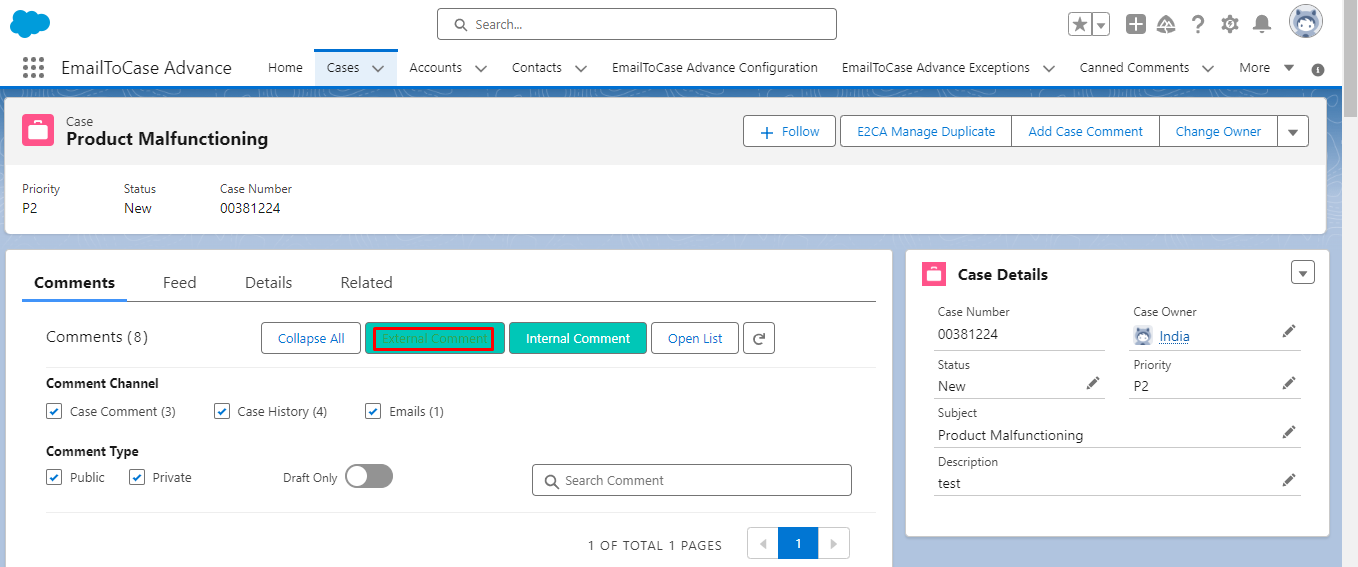
d) Public and Private Button Text
This feature allows customization of the text displayed on public and private comment buttons.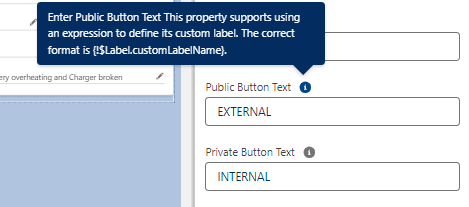
How to configure:
-
Navigate to the Comment Timeline Component settings.
-
For public comments:
-
Enter the desired text in the "Public button text" field (e.g., "Outside Comment").
-
-
For private comments:
-
Enter the desired text in the "Private button text" field (e.g., "Inside Comment").
-


Functioning: After configuration, the text on the public and private comment buttons have changed to the specified text ("Outside Comment" for public and "Inside Comment" for private).
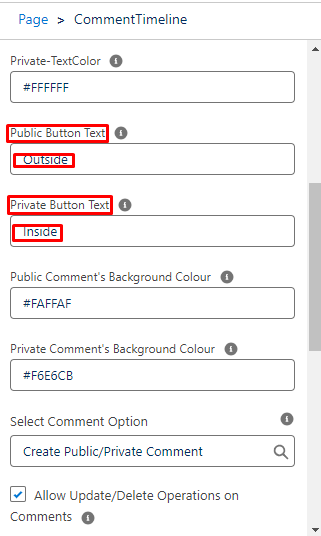
e) Public and Private Comment Background Color
-
This feature allows customization of the background color for public and private comments.

How to configure:
-
Navigate to the Comment Timeline Component settings.
-
For public comments:
-
Enter the desired color code in the Public Comment's Background Colour field (e.g., #FAFAFA or yellow).
-

-
-
For private comments:
-
Enter the desired color code in the Private Comment's Background Colour field (e.g., #F6E6CB or pink).
-
-

Functioning:
After configuration, the background color of public comments changes to the specified color (#FAFAFA). The same applies to private comments with their respective color code (#F6E6CB)
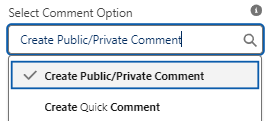
f) Select Comment Option:
This feature provides an option to create comments without explicitly specifying them as public or private.
Select the different comment button options like either Public/Private Comment or Create Quick Comment button.
Create Quick Comment:
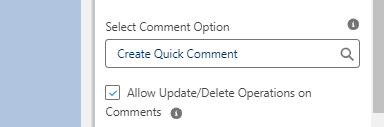
How to configure:
-
Navigate to the Comment Timeline Component settings.
-
Select "Create Quick Comment" from the "Select Comment Option" dropdown.
Functioning: When enabled, users can create comments quickly without having to choose between public and private options.
Create Public/Private Comment:
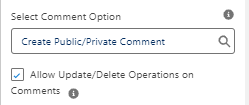
How to configure:
-
Navigate to the Comment Timeline Component settings.
-
Select "Create Public/Private" from the "Select Comment Option" dropdown.
Functioning: When enabled, users can create Public and Private Comments.
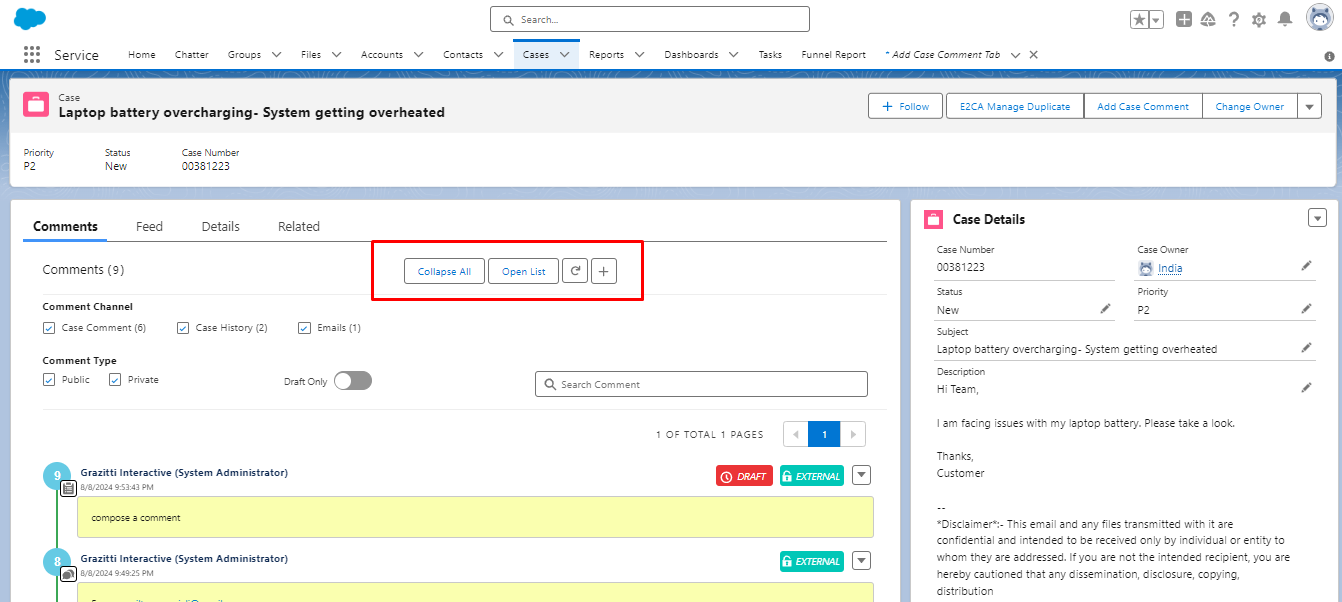
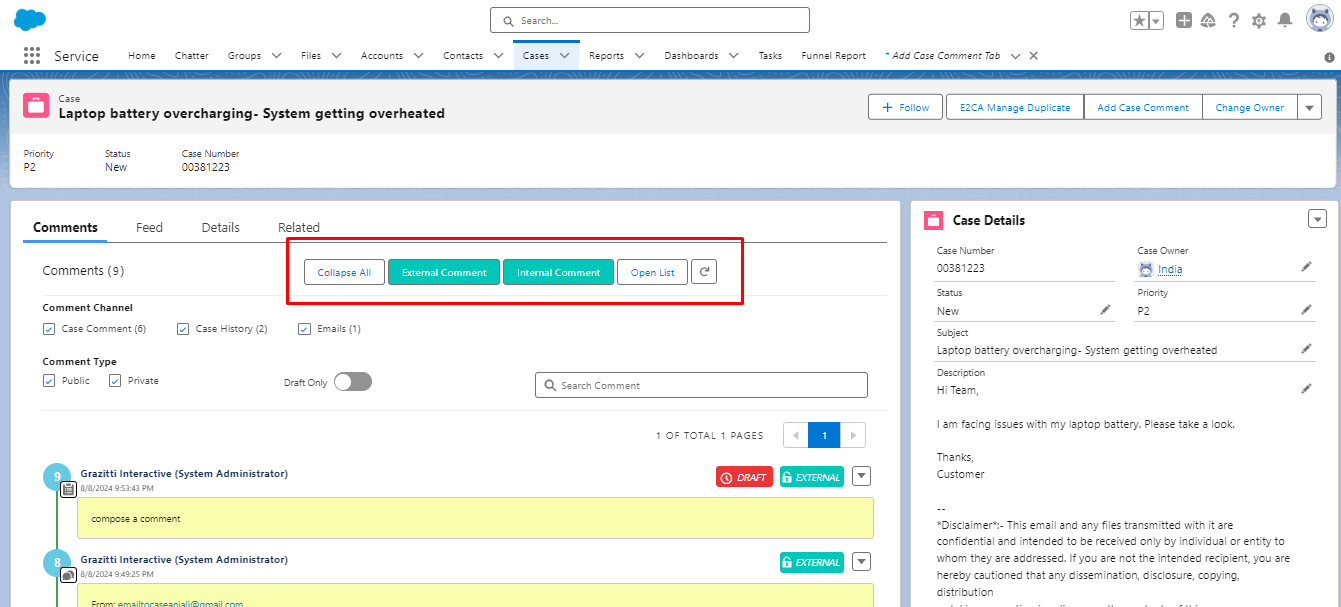
g) Open List Button
Functionality: The Open List button opens the comments in a scrolling format in a different tab.
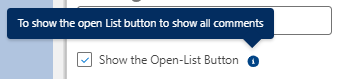
Configuration:
-
Navigate to the Comment Timeline Component settings.
-
Enable the "Show the Open-List Button" option.
Outcome: When enabled, the Open List button will appear, allowing users to view comments in a scrolling format in a different tab.
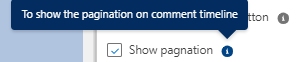
h) Show Pagination
Functionality: This feature displays pagination controls on the comments timeline.
Configuration:
-
Navigate to the Comment Timeline Component settings.
-
Enable the "Show pagination" option.

Outcome: Pagination controls will appear at the top of the comments timeline, allowing users to navigate through multiple pages of comments.
i) Show/Hide Profile Name Feature
This feature allows users to toggle the visibility of profile names against comments in the comment timeline. When enabled, the profile name of the user who made the comment will be displayed.
How to configure:
-
Navigate to the Comment Timeline Component settings.

-
Check or uncheck the "Show Profile Name" option to enable or disable the visibility of profile names.

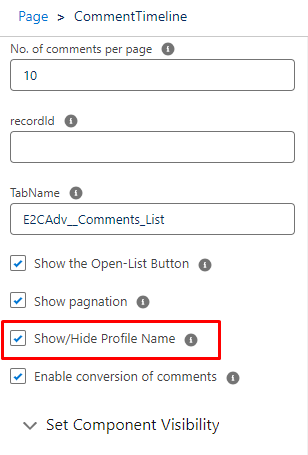

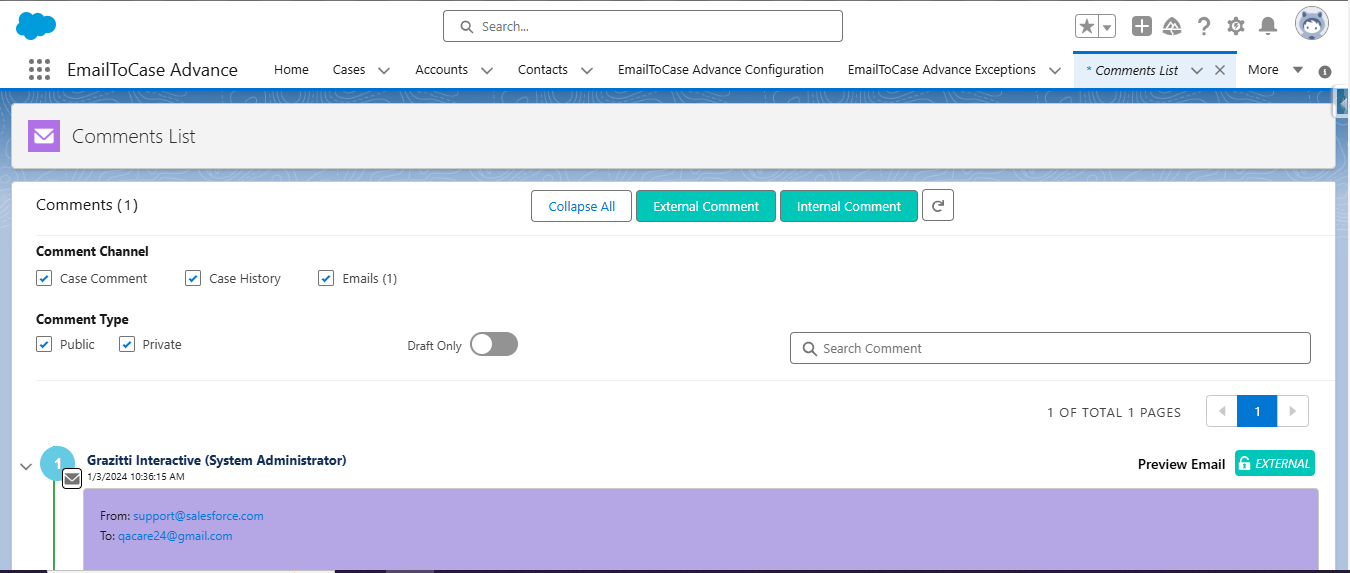
Functioning: When enabled, the profile name of the user will be shown next to their comments in the comment timeline (System Administrator in this case). When disabled, the profile name will be hidden. This setting helps in identifying the comment authors when needed.
j) Enable Conversion of Comments
This feature allows users to convert between public and private comments.
How to configure:
-
Navigate to the Comment Timeline Component settings.

-
Check the "Enable conversion of comments" checkbox.
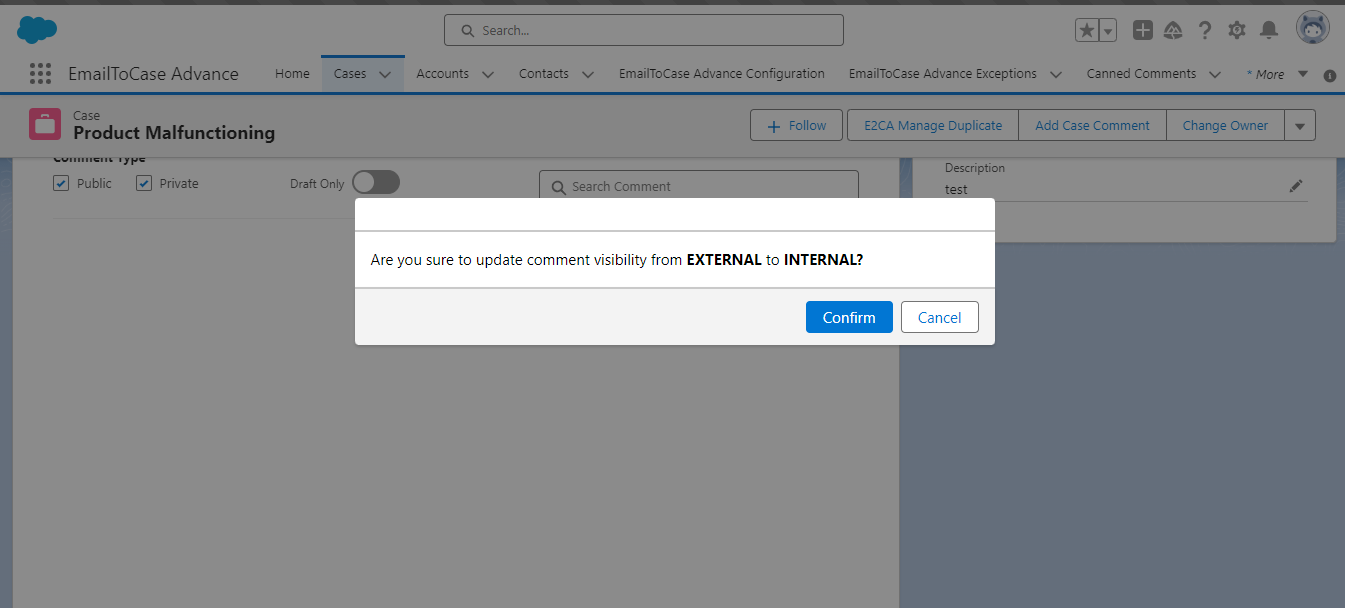


Functioning: When enabled, users can click on the External (public) or Internal (private) button to convert a comment between public and private status.
-
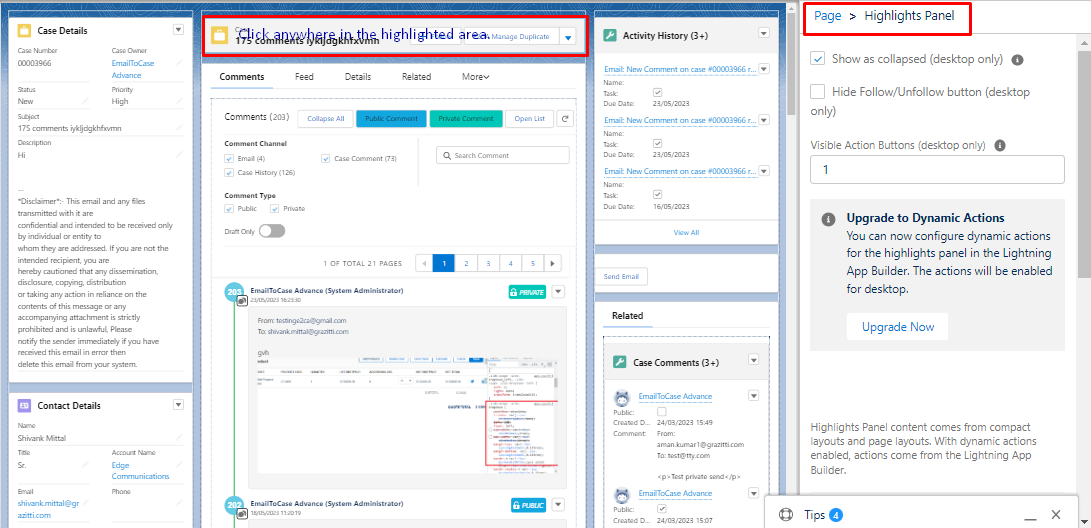
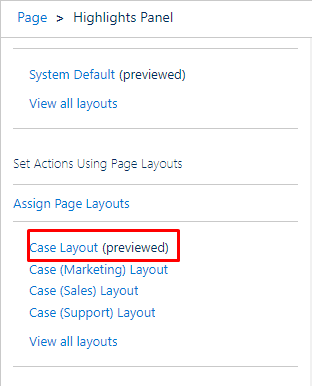
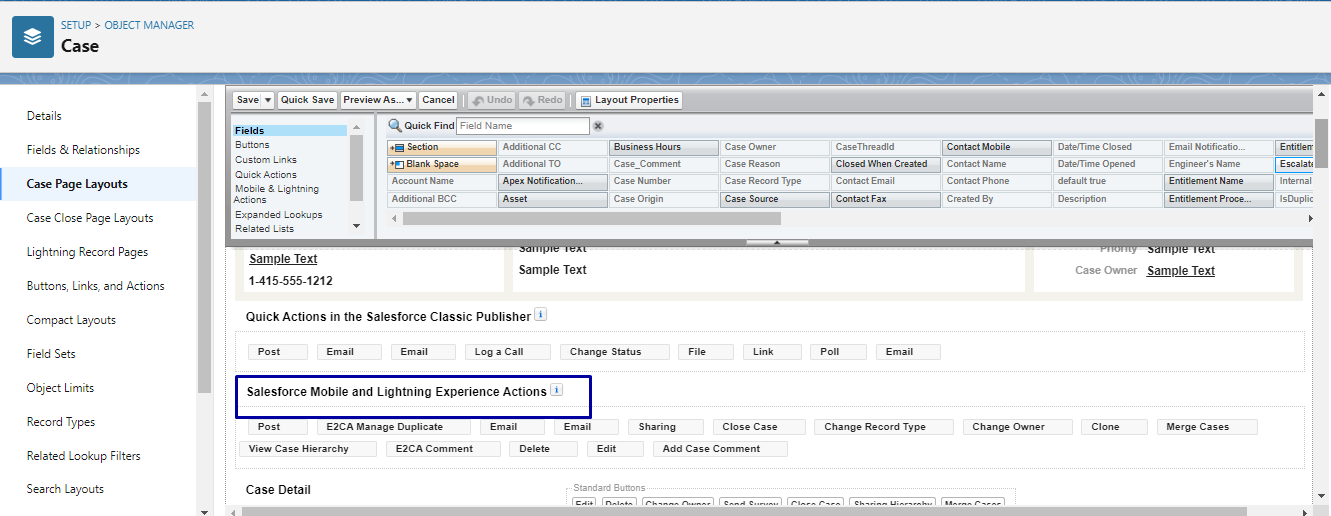
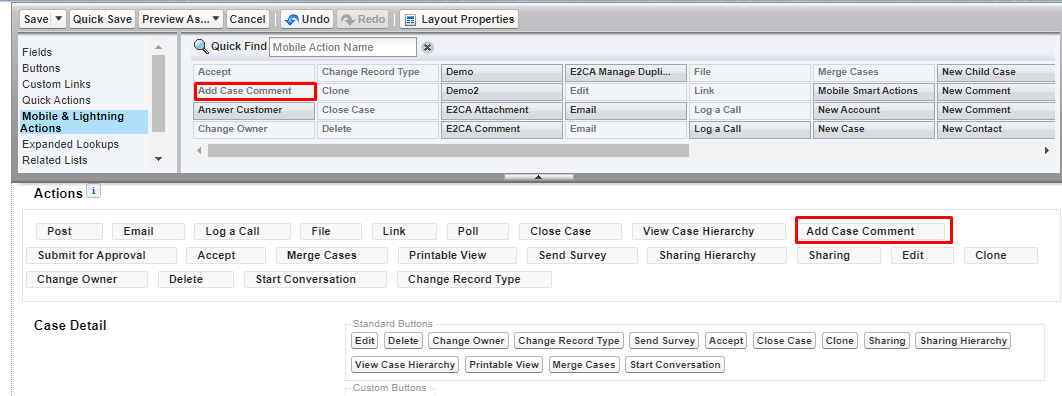
In order to add the Add Case Comment option in the Highlight Panel, click on the panel, select Case Layout from the “Set Actions Using Page Layouts”, a different tab opens up, drag and drop the Add Case Comment button on the “Mobile & Lightning Actions”.
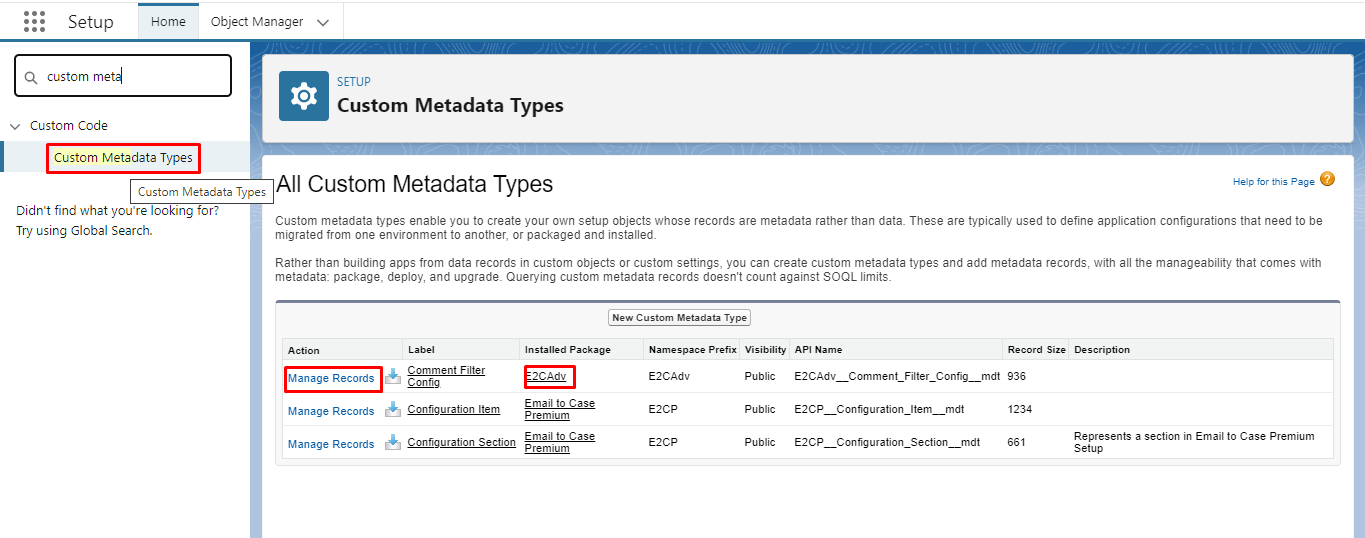
Custom MetaData
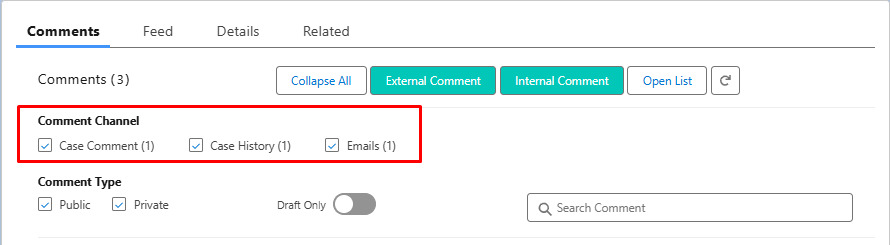
Post customizing the Comment timeline, the admin has the ability to add filters under the comment channel using custom metadata.
Follow the below steps to create custom comment channels:
-
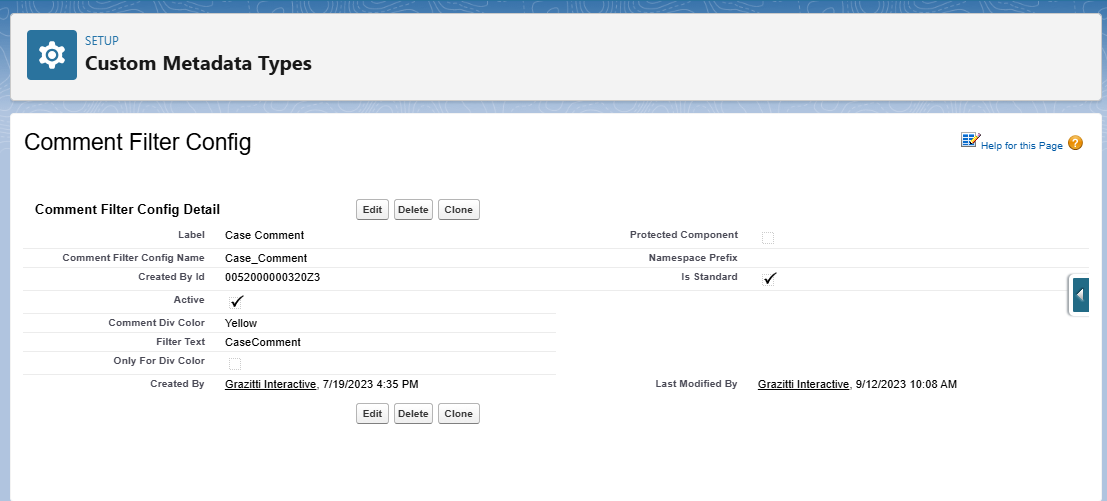
Search Custom Metadata on the setup page and click on Manage Records of Comment Filter config (E2CAdv).
-
Click on New and add the below details:
-
Label - Case Comment,
-
Mark the checkbox - Active
-
Enter the User ID in - Created by Id
-
Define the color in the Comment div color by either adding the color code or the color name like green, yellow, pink, etc.,
-
Add Filter Text - CaseComments
-
Select the checkbox - Is Standard
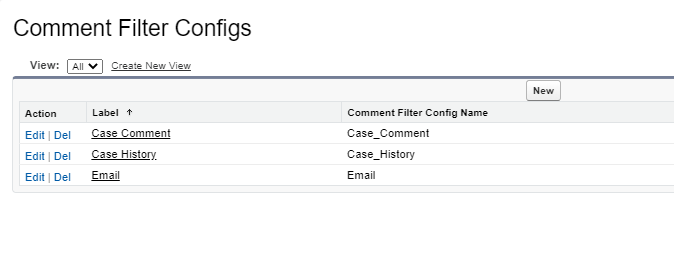
3. Similarly create different channels like Emails, Case History, and more using the above process.
4. On Successful Addition of Comment channels
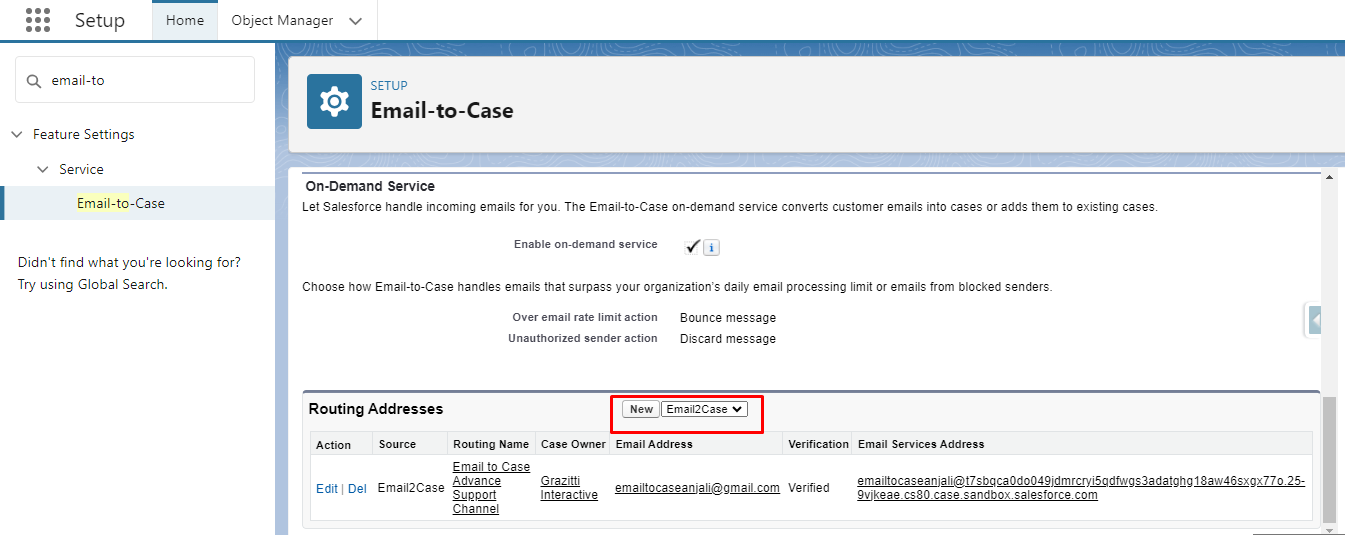
Create Routing Address
The Admin has the ability to create different routing addresses which will be used by the Customer to report the issues based upon which the cases will be created in Salesforce.
Follow the below process to create routing addresses:
-
Under Setup -> Email-to-Case -> Routing Address -> Click on New.
-
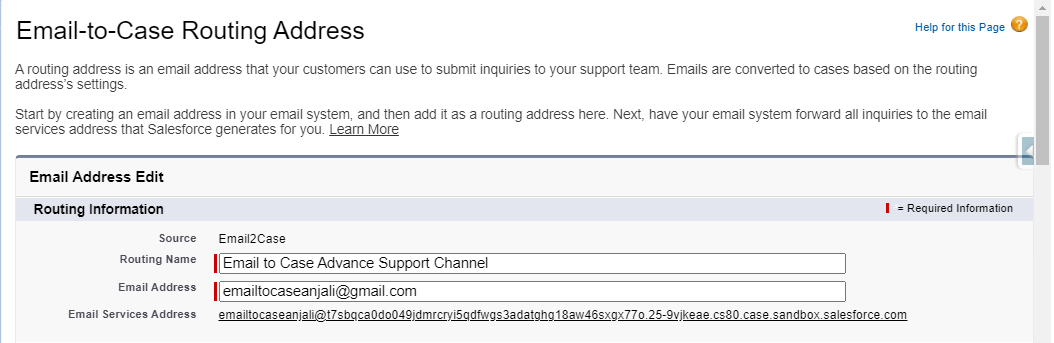
Enter the Below details:
-
Routing Name
-
Email Address - this email address will be used by Customer to report the issues and the case will be created in Salesforce
-
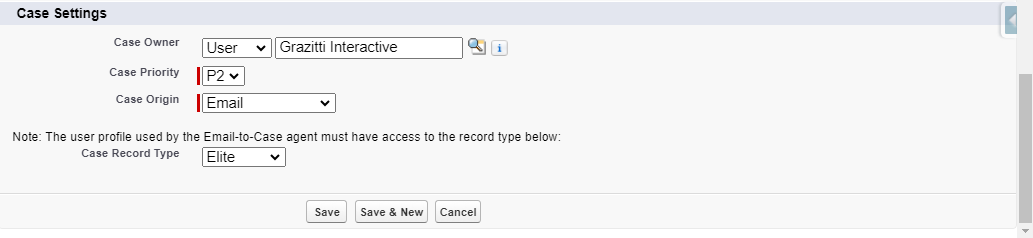
Select Case Owner as User -> Grazitti Interactive
-
Case Priority
-
Case Origin as Email
-
Case Record Type
-
-
Click on Save.
-
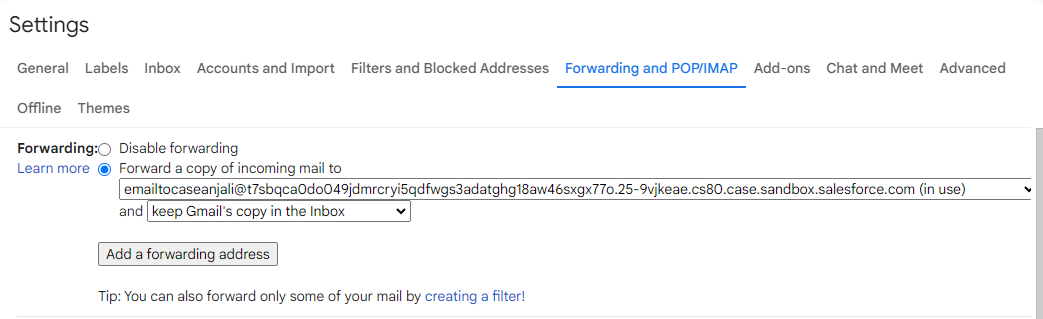
Navigate to the Email account where forwarding will be applied.
-
Click on Settings.
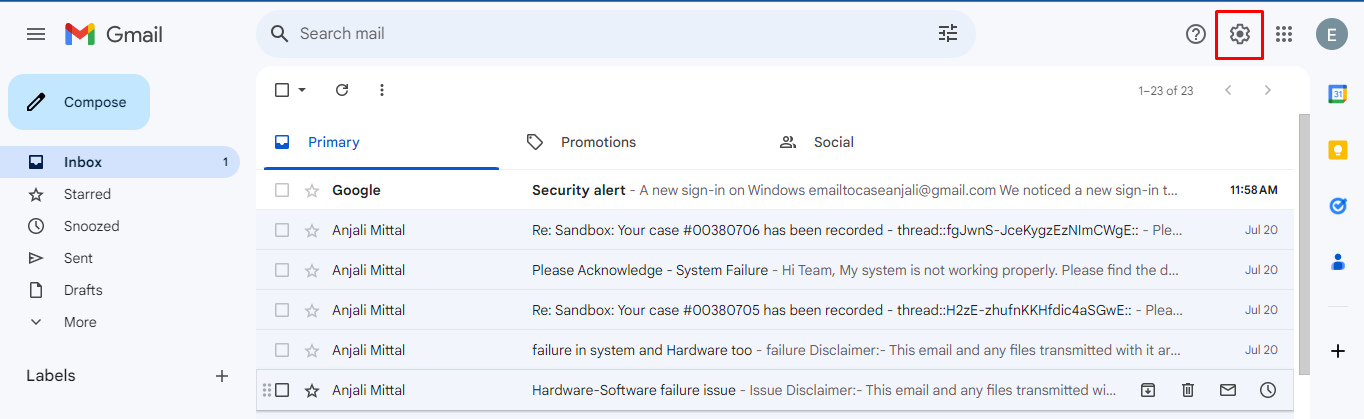
-
Under Forwarding and POP/IMAP, Click on Add a Forwarding address.
-
Enter the Automatic generated Email Service Address, click on Next.
-
A confirmation code will be generated in the form of a case in E2CA. USe the code to verify the forwarding and enable the same.
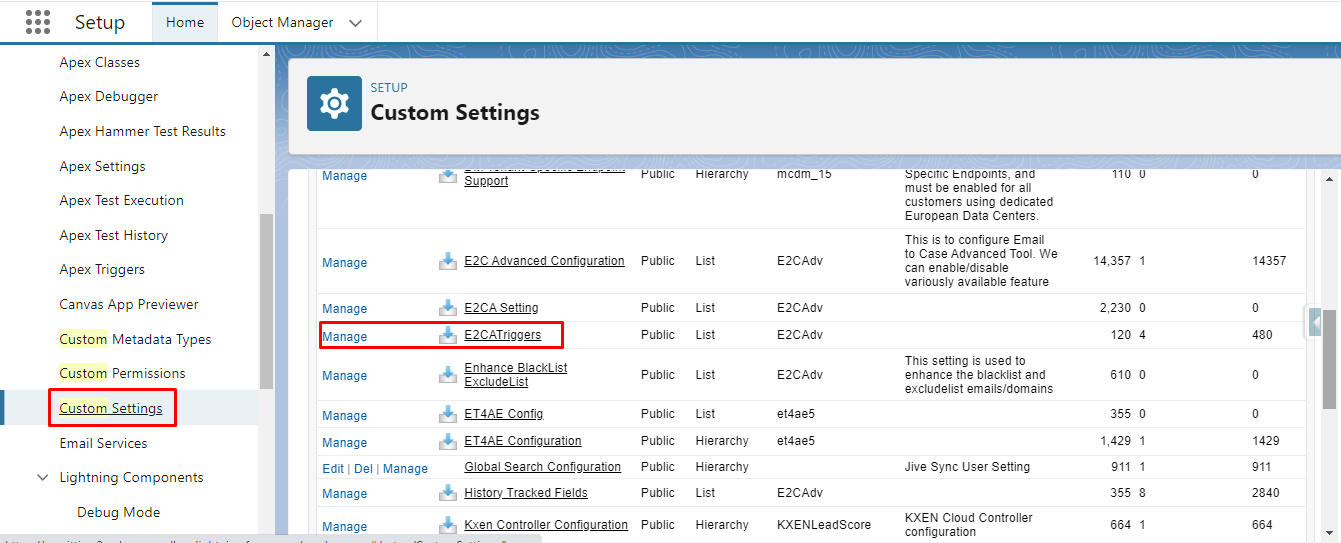
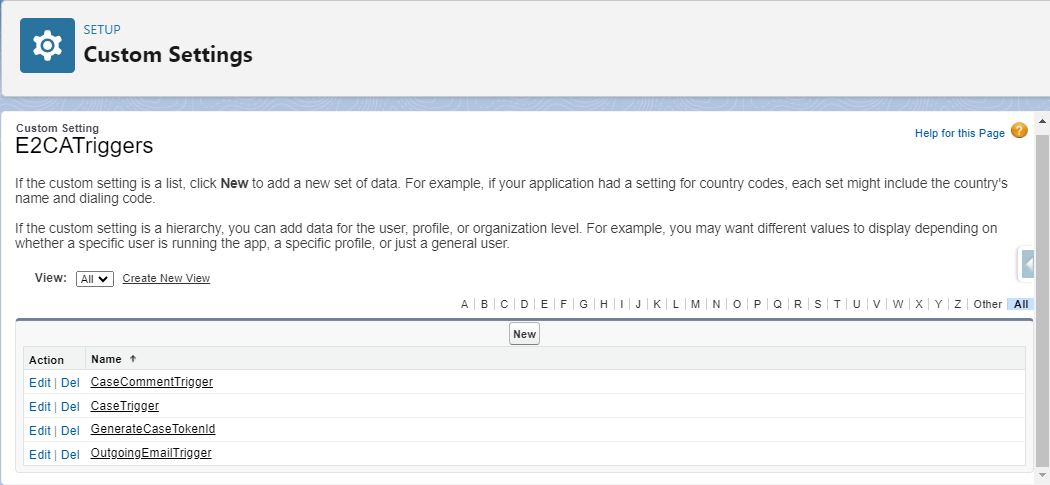
Custom Settings/E2CA triggers
-
Under Setup -> Custom Settings, Click on Manage under E2CA Triggers.
-
Add the below triggers:
-
CaseCommentTrigger
-
CaseTrigger
-
GenerateCaseTokenId
-
OutgoingEmailTrigger
-
Community User Interface
In E2CA, we have the ability to provide different user interface for different users as per the client’s requirements.
Below is the Comment Timeline view for community users:
Admin has the ability to the following design attributes in the builder:
-
Choose the default channel filter from the below dropdown.
-
Choose default type filter from the dropdown.
-
Choose the button background and button text color, button name.
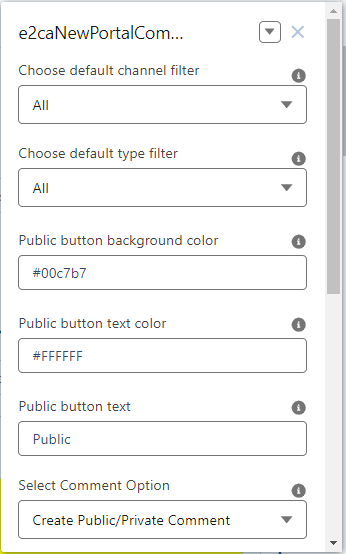
-
Choose comment optionfrom the dropdown.

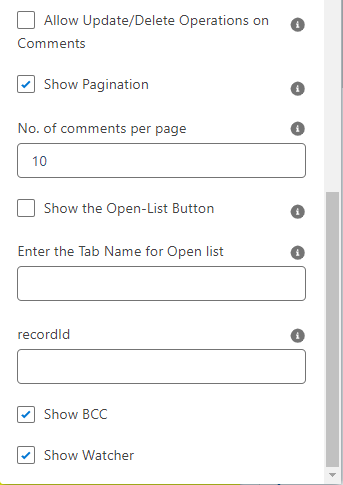
-
THe agent will also have the ability to include pagination, no. of comments per page, Open List button on the Comment Timeline.
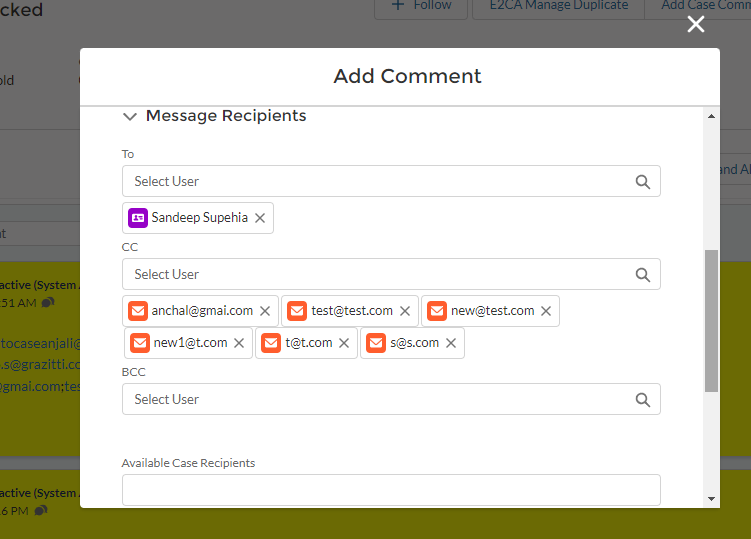
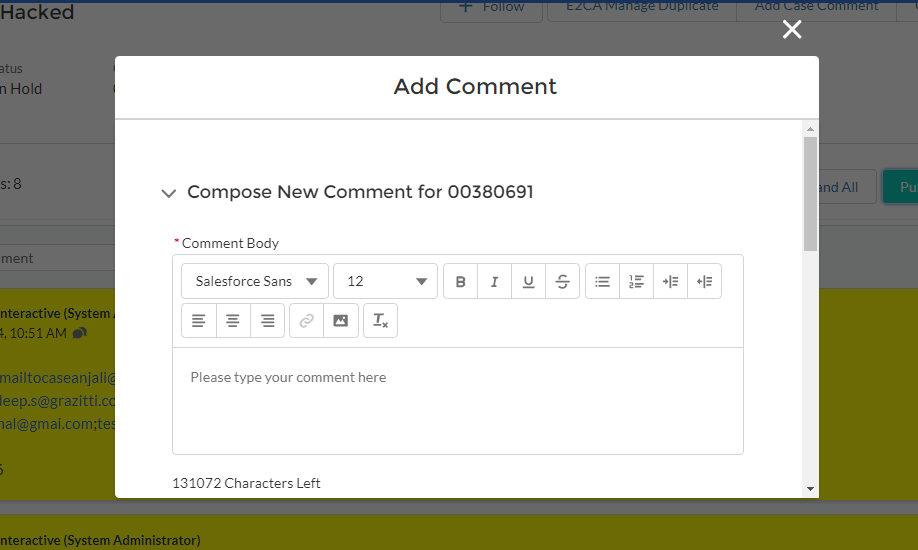
When the user clicks on Public comment button, a modal opens to compose the comment as shown below. The user will have the ability to compose the comment body using rich text editor, manage recipients and attach attachments/files with the comments.
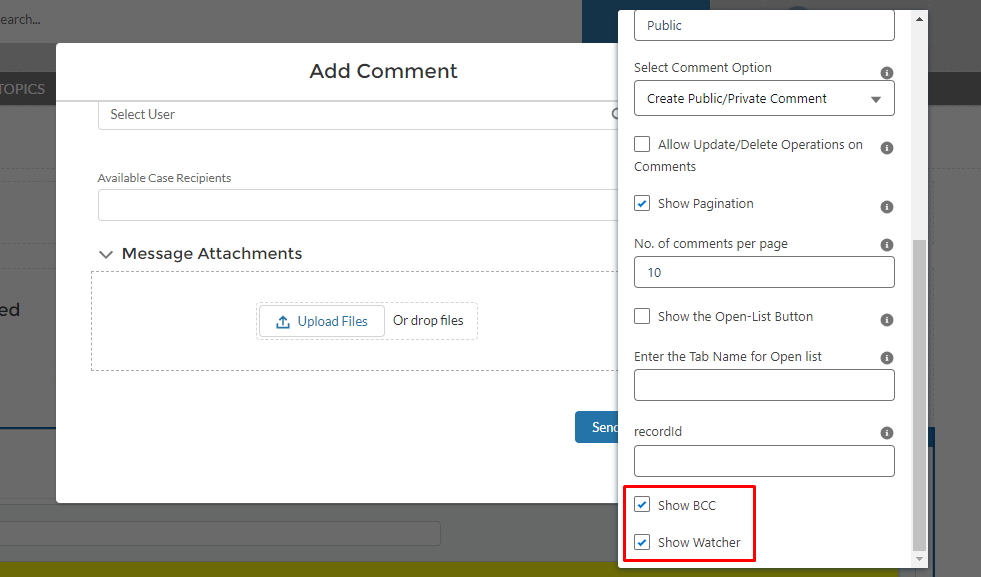
The admin will have the ability to include BCC and Watchers on the Add comment page with the help of setting available in the builder as shown below: